Greengrass
The following document describes how you can set up IBH Link UA to run AWS IoT Greengrass using the IoT SD Card.
If you want to learn more about AWS IoT Greengrass in general please refer to the official guide.
Note that AWS IoT Greengrass is only available on the IBH Link UA Quadcore Version. An SD Card image can be obtained from our Support Team.
Contents
Preparation
Setting up Greengrass Groups
In this guide we will assume that you have a basic knowledge on AWS IoT Groups. If you need help you can follow this guide to learn how to set up AWS IoT Greengrass Groups.
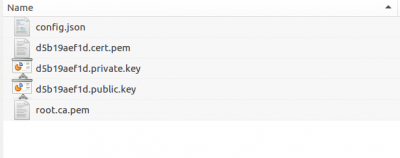
At this point you should already have configured an AWS Greengrass Group and your certificate and configuration files should be available. You should also have downloaded an appropriate root CA certificate for AWS IoT Core. The following files should now be available in a local directory:
<hash>.cert.pem
<hash>.public.key
<hash>.private.key
config.json
root.ca.pem
where <hash> is your individual hash.
Preparing the SD Card
Windows
The IBH IoT SD Card image is typically distributed as an tar.gz file (e.g. "ibhlinkua-iot-sdcard-image.tar.gz"). On Windows you can use a program such as 7-Zip to unpack the file:
- Right click on the File (e.g. "ibhlinkua-iot-sdcard-image.tar.gz") and choose "7-Zip>Extract here". This may take a while.
- After that you should have a tar file (e.g. "ibhlinkua-iot-sdcard-image.tar"). Extract it again using 7-zip.
- In the end you should have an sdcard file (e.g. "ibhsoftec-headless-image-phyboard-mira-imx6-5.sdcard"). This is the image file which can be written to an SD Card
To write the image on an SD Card you need on Windows a program such as Win32DiskImager. Launch the program and select the image file (e.g. "ibhsoftec-headless-image-phyboard-mira-imx6-5.sdcard") and the drive of your SD card. Click on write. This may take a while.
Description
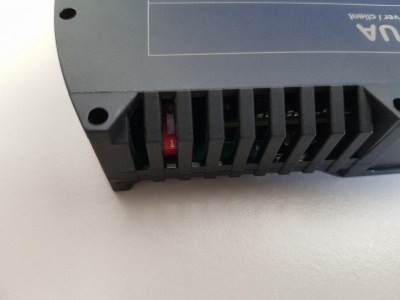
First ensure that the IoT SD Card is inserted in the IBH Link UA and that the boot switch is set to external boot. The switch is located behind an air vent and should point inwards:
The AWS IoT Greengrass software is already installed on the IBH Link UA System in the direcory
/greengrass
and the environment is set up properly. You only need to set up your configuration and certificate files.
Note that on the IBH Link UA SD Card System your login credentials are given by
user: root
password: root
Transfer files
Linux
Open a terminal in the directory containing the certificates and configuration file. To transfer the files you need to run the following commands:
scp <hash>.cert.pem root@<ip>:"/greengrass/certs/"
scp <hash>.public.key root@<ip>:"/greengrass/certs/"
scp <hash>.private.key root@<ip>:"/greengrass/certs/"
scp root.ca.pem root@<ip>:"/greengrass/certs/"
scp config.json root@<ip>:"/greengrass/config/"
where <ip> is the IP-Address of your IBH Link UA and <hash> is your individual hash. Note that you may need to enter the credentials given above. To avoid this you can use commands like sshpass, e.g.
sshpass -p "root" scp root.ca.pem root@<ip>:"/greengrass/certs/"
Windows
On Windows you may need to use a tool such as the PuTTY pscp command. To use it, open a Command Prompt in the folder containing the certificates and configuration file and run:
pscp -pw root <hash>.cert.pem root@<ip>:"/greengrass/certs/"
pscp -pw root <hash>..public.key root@<ip>:"/greengrass/certs/"
pscp -pw root <hash>.private.key root@<ip>:"/greengrass/certs/"
pscp -pw root root.ca.pem root@<ip>:"/greengrass/certs/"
pscp -pw root config.json root@<ip>:"/greengrass/config/"
where <ip> is the IP-Address of your IBH Link UA and <hash> is your individual hash.
Starting AWS IoT Greengrass
After you have copied the configuration and certificate files you can start the AWS IoT Greengrass Core software on the IBH Link UA. To do this log into your IBH Link UA with the credentials above using the ssh command. On Linux, open a terminal and run
ssh root@<ip>
and enter the password "root". If you use Windows, you may need to use a tool such as PuTTY. When you are logged in on your IBH Link UA, you can start AWS IoT Greengrass with the following command:
/greengrass/ggc/core/greengrassd start
If your configuration file is correct and your certificate files are copied correctly, you should see a message which reports a successful start:
If you wish to stop AWS IoT Greengrass you need to run
/greengrass/ggc/core/greengrassd stop
Autostart AWS IoT Greengrass
You can automate this process so that AWS IoT Greengrass automatically starts when the device is booting. To do so you must enable the autostart script by running
ln -sf ../init.d/greengrass /etc/rc3.d/S89greengrass
To disable the autostart script, you have to run
rm /etc/rc3.d/S89greengrass
Deploy a Greengrass Group
A detailed guide how to start the deployment is given in the official AWS IoT Greengrass Guide.
Make sure you have configured your IBH Link UA using the steps above and you have started AWS IoT Greengrass on your device. You can now deploy the Greengrass Group configuration you have used to set up your IBH Link UA. In the AWS IoT Core Console go to the corresponding group configuration page. On the right click on "Action" and then on "Deploy". If this is the first time you may have to configure a few options. The deployment may take some time. In the end you should see the status "Successfully completed".


