Difference between revisions of "IBHLink S7++:LOGO! with IBHLink S7++"
(→Settings of the LOGO! via Display) |
|||
| Line 1: | Line 1: | ||
== S7 Connection from Siemens LOGO! (RCE version) to a S7 PLC via [http://www.ibhsoftec.com/IBH-Link-S7-PP-Eng IBHLink S7++] or [http://www.ibhsoftec.com/IBH-Link-S7-PP-HS-Eng IBHLink S7++ HS]== | == S7 Connection from Siemens LOGO! (RCE version) to a S7 PLC via [http://www.ibhsoftec.com/IBH-Link-S7-PP-Eng IBHLink S7++] or [http://www.ibhsoftec.com/IBH-Link-S7-PP-HS-Eng IBHLink S7++ HS]== | ||
| − | The RCE versions | + | The RCE versions of Siemens LOGO! are equiped with an Ethernet port and support S7 connections via Ethernet. This allows a data communication between LOGO! and a S7-PLC via IBH Link S7++. Process data can be exchanged between both PLCs. |
| − | Below | + | Below is the decription, how to setup the LOGO! for data communication with the IBH Link S7++. |
== Communikation == | == Communikation == | ||
| − | The | + | The communication with the LOGO! will be established over S7 connections. The LOGO! can read and write from following data areas of the S7 PLC via IBH Link S7++: |
* Inputs | * Inputs | ||
| Line 14: | Line 14: | ||
* Flags | * Flags | ||
| − | * | + | * Contents of data blocks. |
== Settings of the LOGO! via Display == | == Settings of the LOGO! via Display == | ||
| − | First of all the LOGO! must be accessible via Ethernet. After that, an IP address can be set with the LOGO! Soft Comfort software. Maybe the IP address of the PC | + | First of all, the LOGO! must be accessible via Ethernet. After that, an IP address can be set with the LOGO! Soft Comfort software. Maybe the IP address of the PC needs to be changed, so that the LOGO! and the PC are within the same subnet. |
The current address of LOGO! is shown on the display. | The current address of LOGO! is shown on the display. | ||
| Line 33: | Line 33: | ||
[[Image:logo-comfort-setaddr-eng.png|none]] | [[Image:logo-comfort-setaddr-eng.png|none]] | ||
| − | + | After that, the LOGO! must be configured to establish Client connections to other stations. | |
Via "Tools - Ethernet Connections" a new connection can be added. | Via "Tools - Ethernet Connections" a new connection can be added. | ||
| Line 43: | Line 43: | ||
[[Image:logo-comfort-softsps-eng.png|none]] | [[Image:logo-comfort-softsps-eng.png|none]] | ||
| − | A Client connection must be selected. The settings for the TSAPs are local '20.00' and remote '01.nn'. 'nn' stands for the MPI address of the S7 PLC | + | A Client connection must be selected. The settings for the TSAPs are local '20.00' and remote '01.nn'. 'nn' stands for the MPI address of the S7 PLC. The syntax is Hexadecimal, which means '01.15' stands for the address 21, '01.02' for the address 2. As operations, read and write are available. The local variables relate to the internal simulated DB1. The syntax for variables from the local DB is VBn, for the remote partner is S7 Syntax. |
To exchange variables with the DB1, the DB must be created. Via "Tools - Parameter VM Mapping" the elements of the program can be selcted, which should be mapped within the DB1. | To exchange variables with the DB1, the DB must be created. Via "Tools - Parameter VM Mapping" the elements of the program can be selcted, which should be mapped within the DB1. | ||
| Line 53: | Line 53: | ||
== Access with IBHNet object == | == Access with IBHNet object == | ||
| − | Beginning with IBHNet V1.49 it is possible to access the LOGO! via 'RFC1006'. | + | Beginning with IBHNet V1.49 it is possible to access the LOGO! via 'RFC1006'. The MPI Address for the function 'Connect()' is 128, for 'Connect_DP()' it is the Slot 128. As variables, Inputs, Outputs, Flags, the DB1 and the Order No. can be selected. |
Latest revision as of 11:51, 29 January 2013
Contents
S7 Connection from Siemens LOGO! (RCE version) to a S7 PLC via IBHLink S7++ or IBHLink S7++ HS
The RCE versions of Siemens LOGO! are equiped with an Ethernet port and support S7 connections via Ethernet. This allows a data communication between LOGO! and a S7-PLC via IBH Link S7++. Process data can be exchanged between both PLCs. Below is the decription, how to setup the LOGO! for data communication with the IBH Link S7++.
Communikation
The communication with the LOGO! will be established over S7 connections. The LOGO! can read and write from following data areas of the S7 PLC via IBH Link S7++:
- Inputs
- Outputs
- Flags
- Contents of data blocks.
Settings of the LOGO! via Display
First of all, the LOGO! must be accessible via Ethernet. After that, an IP address can be set with the LOGO! Soft Comfort software. Maybe the IP address of the PC needs to be changed, so that the LOGO! and the PC are within the same subnet. The current address of LOGO! is shown on the display.
- With <ESC> you'll get to the settings.
- Scroll down until <network> appears.
- <OK> 'IP address'. <OK> The current address is shown.
Settings within the LOGO!Soft Comfort software
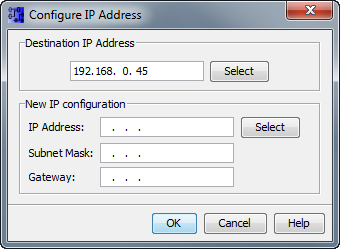
Within the LOGO!Soft Comfort software setup the IP address of the PLC via "Tools - Transfer - Configure Network Address".
After that, the LOGO! must be configured to establish Client connections to other stations.
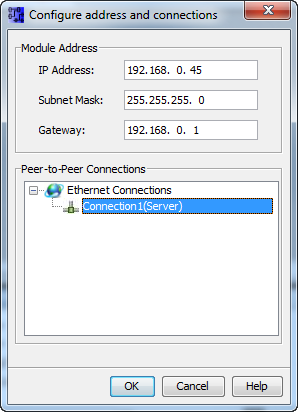
Via "Tools - Ethernet Connections" a new connection can be added.
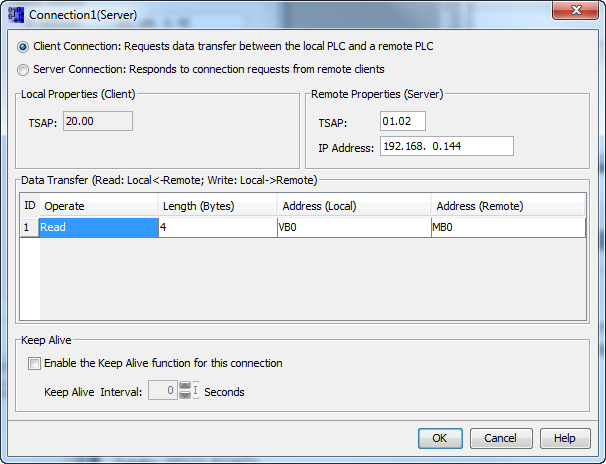
With a double click on the connection, it can be configured.
A Client connection must be selected. The settings for the TSAPs are local '20.00' and remote '01.nn'. 'nn' stands for the MPI address of the S7 PLC. The syntax is Hexadecimal, which means '01.15' stands for the address 21, '01.02' for the address 2. As operations, read and write are available. The local variables relate to the internal simulated DB1. The syntax for variables from the local DB is VBn, for the remote partner is S7 Syntax.
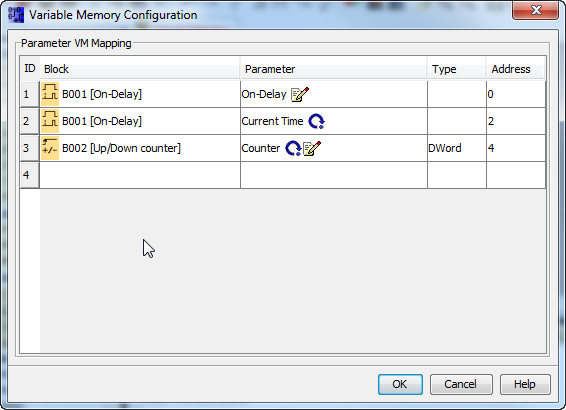
To exchange variables with the DB1, the DB must be created. Via "Tools - Parameter VM Mapping" the elements of the program can be selcted, which should be mapped within the DB1.
Sometimes, the LOGO! Soft Comfort software needs to be restarted after changing the connections, to tranfer the changes to the LOGO!
Access with IBHNet object
Beginning with IBHNet V1.49 it is possible to access the LOGO! via 'RFC1006'. The MPI Address for the function 'Connect()' is 128, for 'Connect_DP()' it is the Slot 128. As variables, Inputs, Outputs, Flags, the DB1 and the Order No. can be selected.


